Quiet Bags
I have twin 2 1/2 year old nieces, for the sanity of my sister, Allison, and learning opportunities for the Twinkies, this year for Christmas I made quite bags for both of them. I saw a bunch on Pinterest, I used some of those ideas, tweaked them, and came up with a few of my own. I thought I’d share them with you.
I feel that with three children, two of whom are twin toddlers, it’s always important that when I send a gift I not only think about what might be fun and help the girls all learn, but also how Allison will store the items. I saw a cool idea on Pinterest where someone put each activity in a large pencil bag however after looking into how much those cost and how many activities I ended up making that was not going to be a cost effective storage solution. I also think that Allison might take these in the car when the family is traveling, so I wanted it to be easy to grab a bunch at once, but also keep each activity contained separately. In the end I went with putting each activity in an appropriately sized zip-lock bag, labeling it with the activity name, and I bought a bunch of accordion type folders that were for 8.5 by 11 inch paper. I added one extra with nothing in it, so Allison can move them around as she needs to, since some of the activities are not yet age appropriate. I made those so that the girls have something to grow into over the next year.


The Twinkies LOVE pizza, so I started off by making a felt “pizza.” I did this one totally free hand with no stencils. I started off with a topee colored circle for the crust, then a red circle a little smaller for sauce, and lastly a circle just a bit smaller out of yellow for cheese. I saw a few other examples where people cut up little rectangle pieces of yellow for the cheese. Allison and her kids travel a lot so it’s likely they will be playing with these in the car sometimes, so I decided that having less tiny pieces to get all over the van was the way to go. Then I used green felt to cut out peppers, black to cut out black olives, red to cut out pepperoni, and light brown for little mushrooms. Allison says this is one of their favorites activities from the whole lot. (Since the girls are twins I made two of many activities, such as these pizzas, and other times I made two activities that were similar but different.)


Our girls love to make funny faces, and one of the first things they learned was how to make a crabby face, it was so cute. Since they love funny faces I made a package with all kinds of hair, noses, ears, lips, glasses, shirts, eye brows, eyes, and one head & neck. (A link to the Sunglasses outlines are below with the Mr. Potato Head information. Most of the shapes for the funny faces I just free-handed.)


On Pinterest I saw a cute quiet book that had Mr. and Mrs. Potato Head in it, but I didn't want to actually make the books, so I just found the stencils online and made felt Mr. and Mrs. Potato Heads to go with the felt funny faces above. I had a fun time making the glasses from another stencil I found, and I used some googlie eyes to finish things off. The links to resources I used are below.
Mr. Potato Head Templet:
This templet was meant to be part of a book however I was not making a book, so I used some of the outlines, but I didn’t use the directions that are part of this page


Here are the sites I used to get started with the glasses, then I just put them in a computer program, printed one, and scaled them up or down to fit my potatoes and funny faces. It’s amazing all the different outlines you can find if you just Google Image Search Sunglasses Outlines:
Cat eye sun glasses:
Sun Glasses:
Heart Glasses:

These felt Ice Cream Cones are a two in one activity. On one side there are letters written in Capitals on the Ice Cream Scoop portion and Lower Case written on the Cone portion. If you flip them over the other side has a waffle grid on the Cone part and nothing on the Ice Cream part, there is also a baggie of “sprinkles” which are just felt circles made from all the left over felt scraps, so you can decorate the Ice Cream Cones.
I used this Sugar Cone Outline:
I used this Ice Cream Scoop Outline:


Here is a color matching activity with little felt popsicles. I used the outline below to cut the popsicle shapes out (I used just the one size that best fit the sticks I had). Then I sewed the two sides together leaving a hole in the bottom just big enough for little hands to put the popsicle sticks in. On one side of the sticks I hot glued a little bit of the same colored felt, and on the other I wrote the color name so this activity can be used when they are learning to read colors, too (or so their older sister can do that now).
Outline for Popsicle:


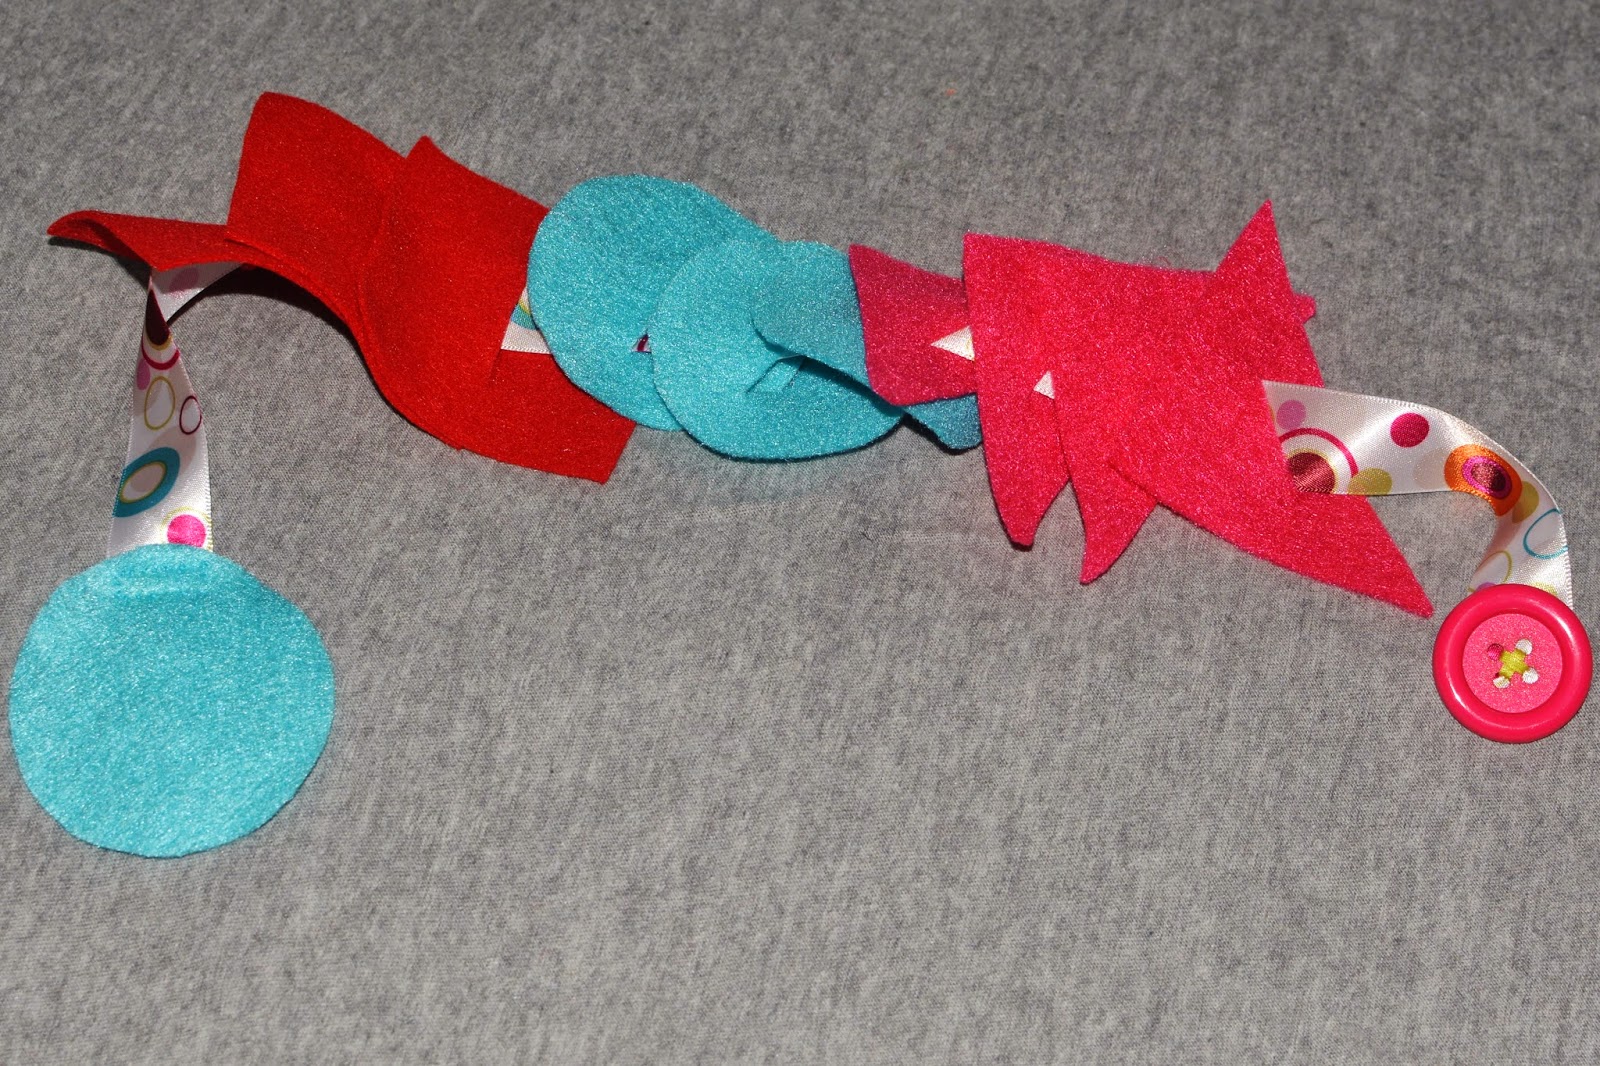
Felt Threading:
This activity is a type of beading/threading but bigger for smaller toddler hands. I found a fun scrap of ribbon, burned each end to make sure it wouldn’t fray, sewed a big colorful button to one end with bright thread, I cut a large round piece of felt out and sewed it onto the other end so that as the girls put felt pieces on they would not fall off. Then I cut out a bunch of shapes from different bright colors of felt, and cut a slit in each one big enough for the large button to get through but leaving enough on each side so that it does not rip when they thread.


Felt Rings:
Remember back in Kindergarten when you made construction paper chains at Christmas time? Well I do. I had a bunch of left over felt, so I decided to make some re-suable pieces for the girls to make chains with by gluing/sticking Velcro on the end of each strip. You have to make sure that the soft side is on one side of the end and the hard side is on the other end and the other side of the strip so that they connect when closed into a circle. I feel this activity is good for fine motor skills, and I also like that it is re-usable.


Pipe Cleaner Activity:
Here is another dexterity activity. I took a Parsley Bottle, took the labels off, and washed it out/off really well. Then I cut some bright fun pipe cleaners a little taller than the bottle and carefully turned the ends under so the Twinkies little fingers weren’t cut accidently. I made two so the girls can each have one of them. Then I made a baggie of plain pipe cleaners, because my mom was a teacher my whole life and I spent many afternoons seeing what all I could made with pipe cleaners. However we didn’t have these cool crazy colors.


Animal Matching:
I found plastic little animals, sorted them between farm animals and jungle animals, found pictures on the internet that looked as close as possible to the plastic ones, put them in a Word document, typed the names underneath, and laminated the pages. The girls can play with the animals or they can match the animal up with the paper cards. I put each set of animals in a snack bag, and put each of the large cards with the small bag into a gallon zip-lock bag for easy storage.


Color Wheels:
I found these color wheels on the internet, took some clothes pins, colored the end with Sharpies, and then laminated the pages. It is a gun way for the girls to learn more about colors.

Worm Activities:
I also found these worms on the internet, they were so cute. I colored one of them with neon sharpies, found some neon colored pom-poms, and laminated the page. I also printed a number worm as well. Then on another site I saw an activity where you took a clear plastic ice tong (like from an ice buket) to place pom-poms onto pictures in order to practice squeezing and dropping for dexterity. This activity allows the girls to do so while matching colors, and then on the other card while practicing counting.

Racetracks:
I think these shape and letter race tracks are so cute. I laminated them as well, and then bought some small inexpensive cars to drive on them. Allison said the two race track activities are amongst the girls favorites from this whole lot.
Race Track Printables:


Racecar Color Matching:
I took a little baggie of match box cars with me to the local hardware store, found a paint chip to match each one, and now the girls can use them for color matching.


Brown Bear Games:
I found these sweet Brown Bear printables, the link to that site is below. I printed them on some card stock with my laser printer and then laminated all of them. First there is a matching heads and tales game, which is so cute, you can also use it to work on identifying and reading colors. Secondly there are counting cards, where little ones can practice touching a shape and counting, they can also be used to practice colors. Lastly there are Big to Little Bears, five brown bears used to learn about little, bigger, bigger, bigger, and biggest.
Matching Game

Counting Cards

Size Bears

Disney Games:
This summer my sister and the girls went to Disney World, so they learned all the characters and really love them. I was happy to find the web site below with a Heads and Tails Matching game, line tracing sheets, and a shape tracing sheet. I printed on card stock and laminated them, so that instead of them being a one-time use item, with a dry erase marker they can be used multiple times.
Here is a link to all the Disney Printables:
Heads and Tails Matching

Tracing


Wallets:
Some children, especially my sister’s girls would pick a real item over a toy any day, so I used some old wallets to make them their own “play” wallet. I used old hotel keys, gift cards that had no money left on them, some old business cards, and a few other items to fill up the slots in each wallet.


Dry Erase Boards:
I wanted to give the girls a way to draw pictures but not have to go through a ton of paper. These cute small little boards seemed like just the right fit.

Sponge Blocks:
These blocks are quiet, even when they fall down, and have the other advantage of being bright and colorful. I just took plain sponges (making sure they aren’t the kind with any chemicals inside) and cut them in strips.


Eggs:
I had a bunch of plastic eggs left over after a large family Easter celebration last year, and I saw a few examples of activities to do with them counting eggs, capital/lowercase letter eggs, and pattern marking eggs.
Counting Eggs
My advice is to make sure that the non-matching egg sides fit together before you start this project, I had quite a time getting enough to fit together. I used a sharpie to draw on the eggs.

Capital and Lowercase Letter Eggs
This activity helps little ones match up capital and lowercase letters, our 2 ½ year olds aren’t ready for this yet, it’s a growing activity.

Pattern Matching Eggs
I printed some egg patterns off the internet on card stock, colored in different patterns, and laminated the egg shapes. (Before coloring your shapes, make sure that your egg halves match, sometimes that can be tricky, if they are different brands.)


I didn’t buy very many of these activities, but I did purchase a few. Those are below.
Wooden Blocks:
When we were little girls my sister, my cousins, and I would play with a big box of wooden blocks, so when I saw these at Hobby Lobby I thought it might be fun for the girls to play with some as well.


Lacing/Puzzle/Shapes/Colors/Letters/Sewing/Building:
I found this pack on Amazon, for $14.00 and there are a lot of learning activities in the little box. I chose to package each of them as separate activities for the girls.


This page inside the package had some interesting ideas as activities to do with these items.

No comments:
Post a Comment